Email Setup on an Apple Device - (Students)

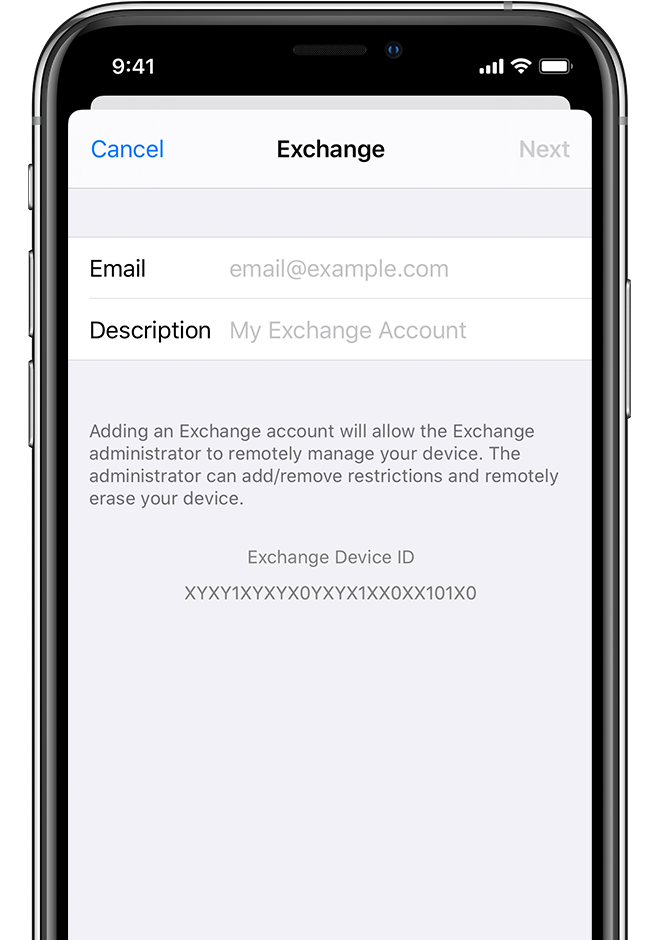
Tap Settings > Passwords & Accounts > Add Account > Exchange  

Enter your address

Enter your email address, then tap Next. This is your username@mail.ozarka.edu

You can also enter an account description.Example: "Student Email"


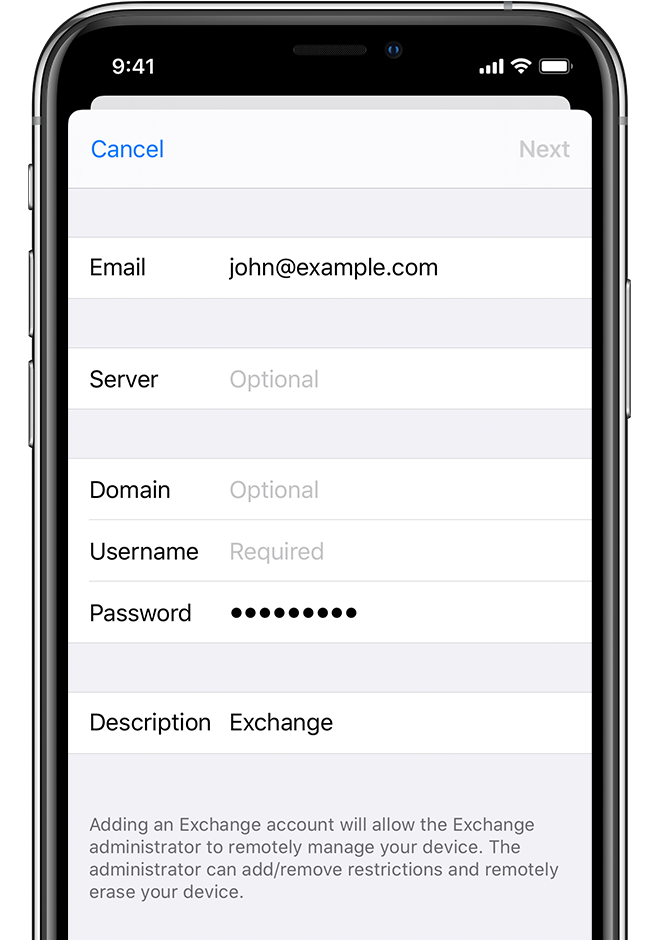
Connect to your Exchange Server

After you enter your email address, choose "Sign In" then enter your Ozarka password. If prompted, the Server is clubhouse.ozarka.edu and the Domain is mail.ozarka.edu


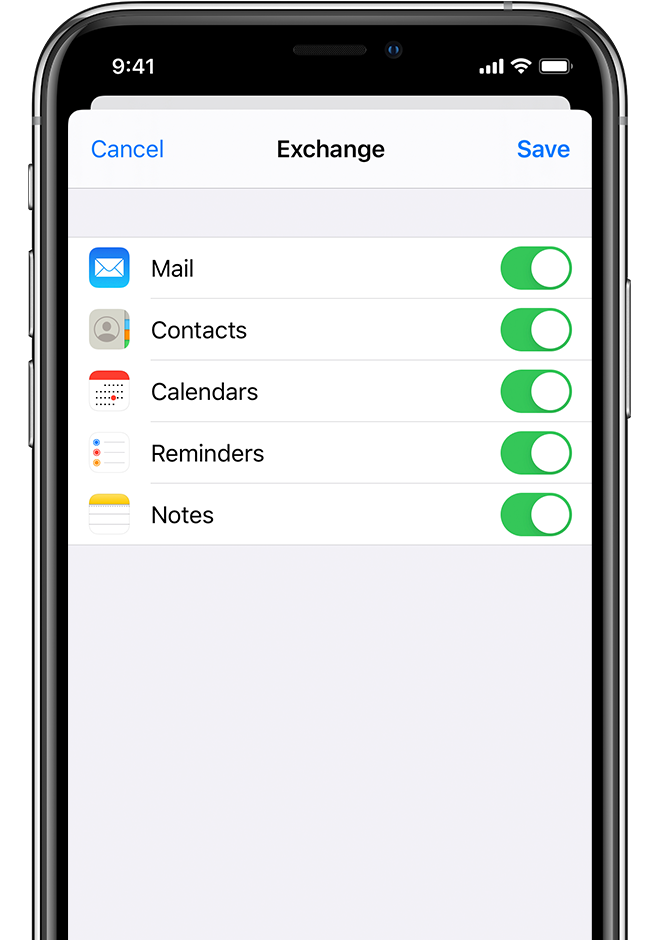
Sync your content

You can sync Mail, Contacts, Calendars, Reminders, and Notes. When you're finished, tap Save.


Email Setup on an Adroid Device

  1. Go to the Email app on your phone.
  2. If you already set up another email account, create a new one. If you have not already set up an email account on your phone, you are automatically prompted to create a new one.
  3. Enter your Email Address and Password. (username@ozarka.edu)
  4. Click Manual Setup.
  5. Click Microsoft Exchange ActiveSync.
  6. Enter youremail address under Domain\Username (username@ozarka.edu).
  7. Enter your Password.
  8. Enter your Microsoft Exchange Server address. (postoffice16.ozarka.edu)
  9. Make sure Use Secure Connection (SSL) is checked.
  10. Click Next.
  11. Click OK to accept any activation and security prompts that appear.
  12. Configure your account options as desired.
  13. Click Next.
  14. Depending on the security prompts that appeared in step 11, you may be asked to activate a device administrator. Click Activate to accept it.
  15. Enter a name for the email account (optional, has no effect on your connection).
  16. Click Done.

Email Setup on an Apple Device - (Fulltime Employees)

Tap Settings > Passwords & Accounts > Add Account > Exchange  

Enter your address

Enter your email address, then tap Next. This is your username@ozarka.edu You can also enter an account description.


Connect to your Exchange Server

After you enter your email address, choose "Sign In" then enter your Ozarka password. If prompted, the server is postoffice16.ozarka.edu


Sync your content

You can sync Mail, Contacts, Calendars, Reminders, and Notes. When you're finished, tap Save.


Setting Up Your Ozarka Email In Microsoft Outlook

For Full-Time Employees

  1. Start Outlook.
  2. On the Tools menu, click Account Settings.
  3. Click New.
  4. Click Microsoft Exchange, POP3, IMAP, or HTTP, and then click Next.
  5. In the Auto Account Setup dialog box, click to select the Manually configure server settings or additional server types check box, and then click Next.
  6. Click Internet E-Mail, and then click Next.
  7. In the Server Information section, select IMAP for Account Type.
  8. In the Your Name box, enter your name exactly as you want it to appear to recipients.
  9. In the E-mail Address box, type your e-mail address. (USERNAME@ozarka.edu) 
  10. In the User Name box, type your account name.
  11. In the Password box, type your password.
  12. In the Incoming mail server box, type postoffice.ozarka.edu.
  13. In the Outgoing mail server (SMTP) box, type postoffice.ozarka.edu. NOTE: IMAP4 is a retrieval protocol. You must have SMTP to send your messages.
  14. Click Next after you have completed entering this configuration information, and then click Finish

Microsoft Office Outlook 2003 and earlier versions of Outlook 

  1. Start Outlook.
  2. On the Tools menu, click E-mail Accounts.
  3. Under E-mail Accounts, click Add a new e-mail account, and then click Next.
  4. Click IMAP as the type of account that you are creating, and then click Next.
  5. In the Your Name box, enter your name exactly as you would like it to appear to recipients.
  6. In the E-mail Address box, type your e-mail address.(USERNAME@ozarka.edu) 
  7. In the User Name box, type your account name.
  8. In the Password box, type your password.
  9. In the Incoming mail server (IMAP) box, type starbuck.ozarka.edu.
  10. In the Outgoing mail server (SMTP) box, type starbuck.ozarka.edu. NOTE: IMAP4 is a retrieval protocol. You need SMTP to send your messages.
  11. Click Next after you have completed entering this configuration information, and then click Finish

For Part-Time Employees 

Microsoft Office Outlook 2007 

  1. Start Outlook.
  2. On the Tools menu, click Account Settings.
  3. Click New.
  4. Click Microsoft Exchange, POP3, IMAP, or HTTP, and then click Next.
  5. In the Auto Account Setup dialog box, click to select the Manually configure server settings or additional server types check box, and then click Next.
  6. Click Internet E-Mail, and then click Next.
  7. In the Server Information section, select IMAP for Account Type.
  8. In the Your Name box, enter your name exactly as you want it to appear to recipients.
  9. In the E-mail Address box, type your e-mail address. (USERNAME@mail.ozarka.edu) 
  10. In the User Name box, type your account name.
  11. In the Password box, type your password.
  12. In the Incoming mail server box, type clubhouse.ozarka.edu.
  13. In the Outgoing mail server (SMTP) box, type point.ozarka.edu. NOTE: IMAP4 is a retrieval protocol. You must have SMTP to send your messages.
  14. Click Next after you have completed entering this configuration information, and then click Finish

Microsoft Office Outlook 2003 and earlier versions of Outlook 

  1. Start Outlook.
  2. On the Tools menu, click E-mail Accounts.
  3. Under E-mail Accounts, click Add a new e-mail account, and then click Next.
  4. Click IMAP as the type of account that you are creating, and then click Next.
  5. In the Your Name box, enter your name exactly as you would like it to appear to recipients.
  6. In the E-mail Address box, type your e-mail address.(USERNAME@mail.ozarka.edu) 
  7. In the User Name box, type your account name.
  8. In the Password box, type your password.
  9. In the Incoming mail server (IMAP) box, type clubhouse.ozarka.edu.
  10. In the Outgoing mail server (SMTP) box, type point.ozarka.edu. NOTE: IMAP4 is a retrieval protocol. You need SMTP to send your messages.
  11. Click Next after you have completed entering this configuration information, and then click Finish.

 For Students 

Microsoft Office Outlook 2007 

  1. Start Outlook.
  2. On the Tools menu, click Account Settings.
  3. Click New.
  4. Click Microsoft Exchange, POP3, IMAP, or HTTP, and then click Next.
  5. In the Auto Account Setup dialog box, click to select the Manually configure server settings or additional server types check box, and then click Next.
  6. Click Internet E-Mail, and then click Next.
  7. In the Server Information section, select IMAP for Account Type.
  8. In the Your Name box, enter your name exactly as you want it to appear to recipients.
  9. In the E-mail Address box, type your e-mail address. (USERNAME@mail.ozarka.edu) 
  10. In the User Name box, type your account name.
  11. In the Password box, type your password.
  12. In the Incoming mail server box, type clubhouse.ozarka.edu.
  13. In the Outgoing mail server (SMTP) box, type point.ozarka.edu. NOTE: IMAP4 is a retrieval protocol. You must have SMTP to send your messages.
  14. Click Next after you have completed entering this configuration information, and then click Finish

Microsoft Office Outlook 2003 and earlier versions of Outlook 

  1. Start Outlook.
  2. On the Tools menu, click E-mail Accounts.
  3. Under E-mail Accounts, click Add a new e-mail account, and then click Next.
  4. Click IMAP as the type of account that you are creating, and then click Next.
  5. In the Your Name box, enter your name exactly as you would like it to appear to recipients.
  6. In the E-mail Address box, type your e-mail address.(USERNAME@mail.ozarka.edu) 
  7. In the User Name box, type your account name.
  8. In the Password box, type your password.
  9. In the Incoming mail server (IMAP) box, type clubhouse.ozarka.edu.
  10. In the Outgoing mail server (SMTP) box, type point.ozarka.edu. NOTE: IMAP4 is a retrieval protocol. You need SMTP to send your messages.
  11. Click Next after you have completed entering this configuration information, and then click Finish.

Forwarding Your Phone

To send calls to an inside extension:

1. Press *33

2. Enter extension number

To send calls to an outside extension:

1. Press *33

2. Enter (9 + the outside number)


(This feature is not automatically enabled for all extensions. If you need this feature enabled, please contact Information Systems.)

To cancel the forward from the sending telephone:

1. Press *33

2. Enter your extension

Password guidelines and instructions for changing passwords

Password Choice Requirements

  • At a minimum, passwords shall be changed every 90 days.
  • Passwords shall be at least eight characters in length and be a mixture of alpha and non-alpha characters
  • User passwords shall not be reused within six password changes.


Suggested strategies for selecting a valid password:
Choose a word, then scramble it with some random numbers (e.g., buffalo becomes Bu3fa2o).
Convert an easy-to-remember phrase into an acronym. "It is a very fine day" could be abbreviated to "iiavfd", and then by adding two nonalphabetic characters, would become a valid password of iia44fd.


Users must never write down or otherwise record their passwords. Each user is responsible for any action taken with that user's login. No college employees or students should ever share or divulge their password to anyone, including other college students and staff, nor should OC employees and administrators ever request a user to divulge his or her password. Users should change their passwords often--at least once every 90 days for staff/faculty and 180 days for students. Any password that a user believes may have been compromised must be changed immediately.

Users must not attempt to determine another user's password through any means. This prohibition applies to passwords for students, faculty, staff, and friends and accounts on systems reached through the Internet.

Account lockouts: An account will be set to lock out a user for a minimum of five minutes after a maximum of 3 failed login attempts.

Password uniqueness: A history of at least 5 passwords should be kept when technically feasible for each account within a system. New passwords should be checked against this history and users prohibited from re-using any matching entries.

Changing Passwords

myOzarka

Click on My Tools
Click on Change Password

Sonisweb

Click on Systems
Click on Change Password

Note: Resetting a password in the Information Systems department requires that the user present a photo ID.


myOzarka login Dropdown Arrow


forgotten password? | register new account

myOzarka support contacts
email: helpdesk@ozarka.edu
phone: 870.368.2021


Are you ready to change your life?